Часы с кукушкой, устройство голосов и их ремонт
Одной из причин выхода из строя звучания голосов у кукушки является возрастные и механические повреждения воздушного меха звуковой камеры.
Ремонт старого меха не всегда бывает успешен, поэтому приходится заново изготавливать из специального материала, а порой, из того материала, что есть под рукой.
На заводе изготавливали меха из тонкой кожи молодого барашка, в 90-е годы перешли на заменитель из специального материала.
В часах с кукушкой, изготовленные на Сердобском часовом заводе, звуковые камеры старого и нового образца голосов идентичны по размеру.
Импортные модели имели различия не только в зависимости от модели, но и от года выпуска.
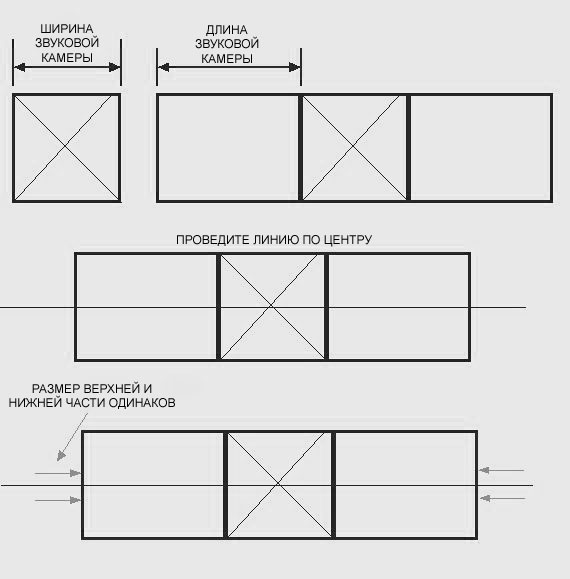
Поэтому, перед удалении старого меха воздушной камеры, необходимо измерить и записать расстояние голоса в открытом состоянии, смотрите рисунок I.
Если материал меха сильно разорван, откройте голос при помощи тяги, если вы уже сняли голоса, откройте голос при помощи руки, это измерение должно быть сопоставимо с открытием голосов, смотрите рисунок II.
Выньте голоса из часов.
Отделять верхнюю часть блоков с воздушным мехом от трубки голоса необходимости нет.
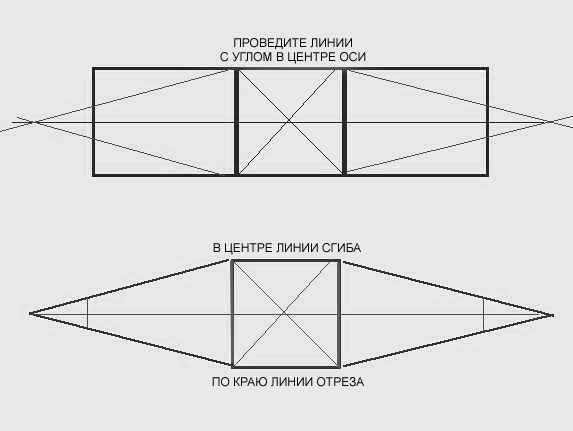
Внимательно посмотрите на приведенный рисунок, как складывается материал для ремонта меха.
изготовление воздушных мехов звуковых камер
|
Удалите старый материал меха, аккуратно срежьте его с верхнего и нижнего блока.
Верхний блок имеет шарнир для крепления тяги, шарнир может быть расположен на передней или боковой части.
Если шарнир мешает, снимите его, отметьте место крепления черным маркером, так, чтобы впоследствии метка была видна через новый материал меха.
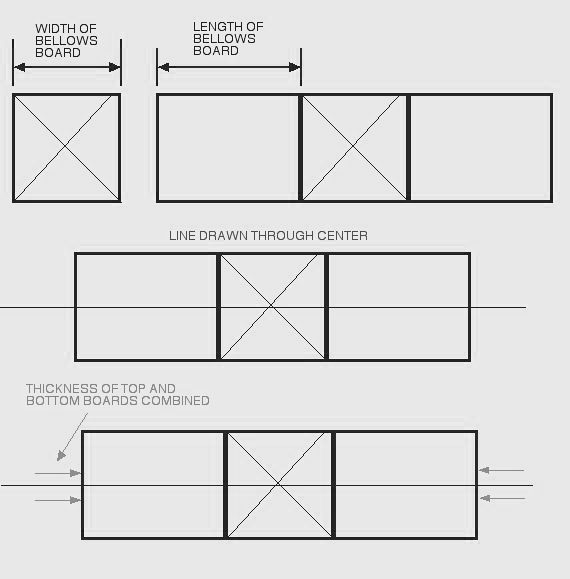
Before removing the old bellows from the clock, measure and write down the distance the bellows open.
See Figure A.
If the bellows material is torn or you have already removed the bellows, measure and write down the distance the lift wire or arm travels.
This measurement should be comparable to the opening of the bellow top.
See Figure B.
Remove the bellows from the clock.
It is not necessary to remove the tops from the pipes.
Take a good look at how the bellow material is folded.
make new bellow tops
|
Cut away the old folded material between the upper and lower blocks of the bellow top.
The hinged end may have many folds or layers over the hinge which need to be removed.
Do not remove the hinge (also see step 4).
All material on the edges of the blocks does not have to be removed as long as it still held tightly to the blocks.
Remove lift wire rings from front or side of bellow block.
Mark the hole with a black felt pen so that the mark will show through the new bellow material when applied.
If the hinge is still intact, leave it and simply place a new piece of the same size bellow material over it, gluing in place with a good water soluble white glue.
If the old hinge and glue is dry and flaky, remove it and put a new hinge in its place.
When installing a completely new hinge do not hold the upper and lower block tightly together.
They will work much better if there is a small amount of space between them.
The hinge material should not extend beyond the edges of the blocks.
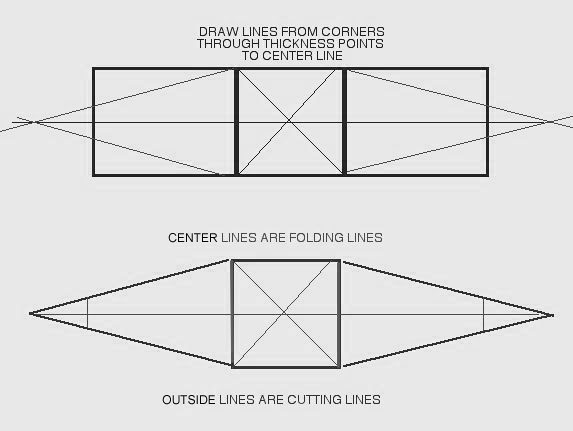
Cut new bellow material as follows: to determine the length, measure the side of the bellow and add 1" (25.4 mm).
Example: if the side of the bellow measures 2-3/8" (60.32 mm.) long, cut the bellow material at 3-3/8"(85.72 mm.) long.
Cut the width at 2-1/4"(57.15 mm.) wide.
Lay the strip of new bellow material on a clean, dry, flat surface.
Lay the side of the bellow on the material with approximately 1/2" (12.7 mm) behind the hinge.
The front top edge of the bellow top should be positioned halfway over the top edge of the new material.
See Figure C.
Check that the opening is the same as recorded in step 1.
Holding the bellow assembly firmly, lift the long end of the strip and bring it over the entire bellows.
Check to see that it covers the blocks entirely.
If it does not, reposition the blocks, maintaining the proper opening distance, so that the material does cover the blocks entirely.
Lay the long end of the strip back down being careful not to move the bellow blocks.
With a pencil mark the position of the blocks on the new material.
See Figure D.
Remove the bellows from the strip and apply a small amount of glue to the bottom and front edges only.
Place the bellows back on the strip in the marked position being careful to keep the new material flat and free of wrinkles.
Grasp the long end of the strip and pull upwards bringing tbe material into contact with the front of the blocks.
Press the material to the glued edges to ensure a good seal.
Place a thin layer of glue on the top edges and pull the material, keeping it flat, over the top pressing it down to make a good seal.
Cut off the excess material leaving approximately 1/2" (12.7 mm) triangular tabs at the hinge end.
Holding the blocks open begin to crease the front side and corners with your fingers.
Slightly push in on the side material, do not let the front bulge out, and with a butter knife or other dull object crease the side folds so that they are straight.
This is all done with the bellows tops no more than 1/2 closed.
Once all of the creases and folds are even and seem to work well, slowly close the bellows making sure that the material is folding properly.
If it is not, use your creasing tool to reform or improve your folds and creases until the bellows opens and closes smoothly and neatly.
Glue the triangular flaps over the hinge.
Keep the bellow, open at least halfway while the glue is drying to prevent it sticking where you don't want it.
NOTE
For bellows with the lift wires and or bird wires on the side, simply place the blocks on their side with the wires pointing up and make small slits in the material around the wires when gluing the top side.